How to Create a Module in Magento 1.9
Module:
A Module is a group of php and xml files meant to extend the system with new functionality.
Code Pools :
In Magento there are three types of Code Pools. All three directories located under the app directory.These directories are :-
- Core
- Community
- Local
Core:- The Core directory contains the core modules which come with magento community edition release. It is not recommended to do any changes into any of the files in core directory. It will make an upgrade cumbersome and all the customization done in the core will disappear whenever you upgrade to a new version.
Community:- We should place modules code in this directory if we are planning to upload the module to magento connect store.
Local:- We put modules into the local directory. We create local directory because it is not present in the code directory.
We create files and directories under the local code pool. We can also create files and directories under the community code pool. Major components of a simple magento module development are:
- Block: A block is the first class element in the structure of Magento layouts. Every page in magento is decorated by the layouts file and the content is filled up by the Blocks of different modules. Block files are used to fetch the data and display it on the template files.
- Model: Model is responsible for managing the data of the application. The model files contains the business logic.
- Controllers: Controller handles the incoming request and renders the page according to the routes defined in the layout files.
- Helper: Helper files contains the common code required in the whole module.
- Etc: etc directory contains the module configuration files which are in xml format. Basically there are two main files . config.xml and system.xml.
- Sql: sql directory contains the database query files which are in need for that module.
Practically Coding a New Module by adhereing to the Magento Architecture:
For Creating a Module go to the app/etc/modules directory and create the YourFileName.xml file. Structure of XML file will be like below:
Note: Module file name should be Companyname_Modulename.xml.
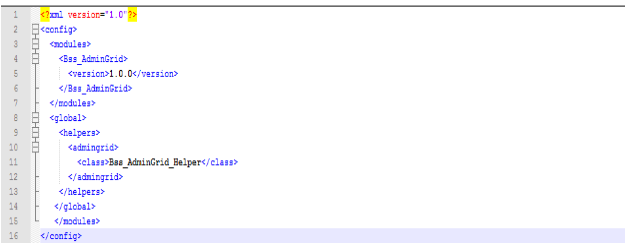
Above xml file tells magento that our module is placed under local code pool and it’s status is active.
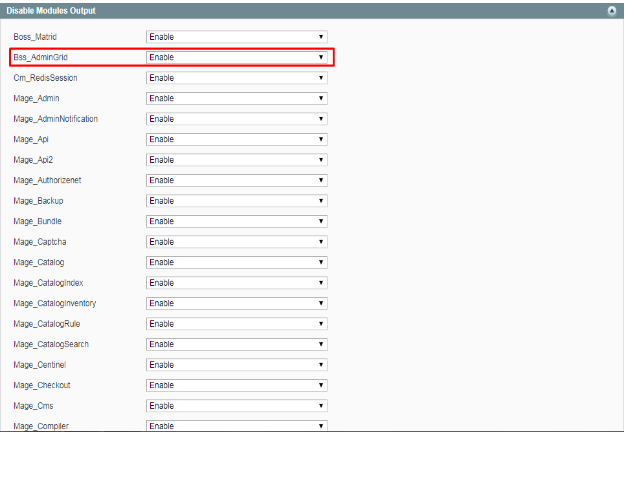
As we create the above, file, you can see the check the status of the module from magento admin panel:
System>>Configuration>>Advanced>>Advanced.
If we are making this module for the Admin Panel, then, go to app/code/local/Bss/AdminGrid/etc and create the config.xml file and add below code:

Above file tells magento everything about the structure of our module. Now try to understand about the tags which we used in above file.
Create an Admin Menu:
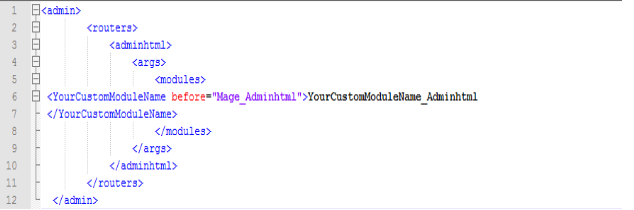
There are two methods to put this link in the Menu. Either we can do it in the above config file or we can go to the app/code/local/Bss/AdminGrid/etc and create the adminhtml.xml file. Add the below code in the file.
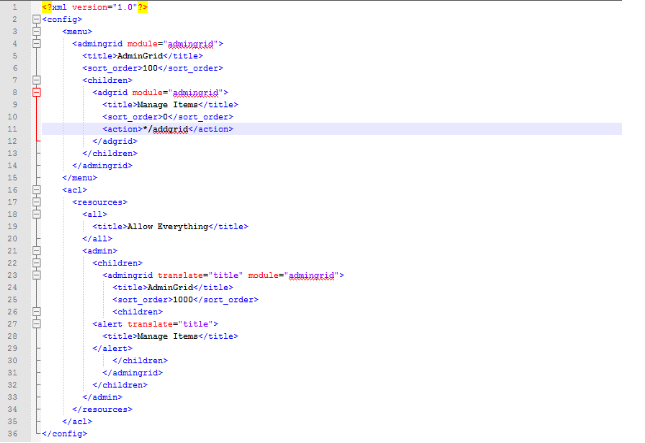
With the help of above file we create Admin Menu.
Now declare the router to load Adminhtml controller in config.xml file.
You can now see the menu items are created in the admin. Top level Menu Admingrid and the child Menu Manage Items is added at Backend.
Change the position of Admin Menu:
To change the position of Admin Menu at Backend. We have to add the below code into the adminhtml.xml file.
E.g. in the below example, we have now moved the newly created menu to the Catalog
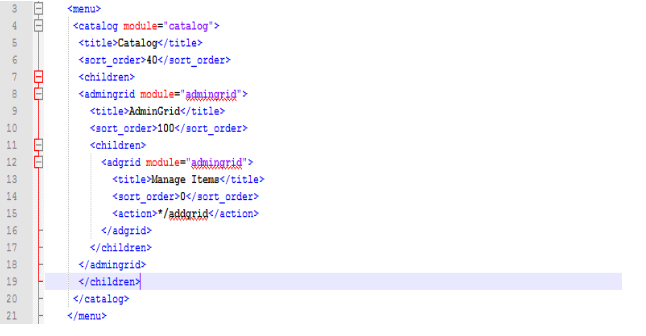
We add the parent class catalog and make admingrid its children class.With the help of this AdminGrid become the child class of Catalog.

Creating a Grid on a new Admin Page:
Step 1:
For creating grid we have to create base model.
Go to the app\code\local\Bss\AdminGrid\Model and create the Addgrid.php file.

Step 2:
Create Collection go to the app\code\local\Bss\AdminGrid\Model\Resource\Addgrid and create a file Collection.php and add the below code in the file.

Step 3:
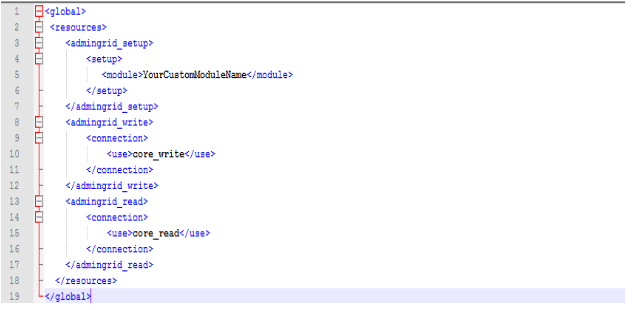
Now declare Model and Resource in the config.xml file.
For Model add the below code in the config.xml file.Add this code in the
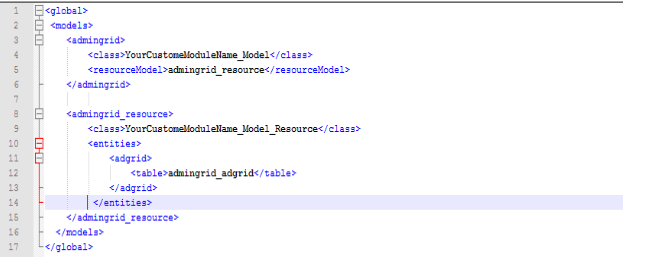
For Resource add this code in the config.xml file into the
Step 4:
Grid page needs to show data, for this example, we have created a table in database with two fields : id and item.
For creating a table go to the app\code\local\Bss\AdminGrid\sql\admingrid_setup and create the mysql4-install-1.0.0.php file and add this code.
We need not to use mysql directly.
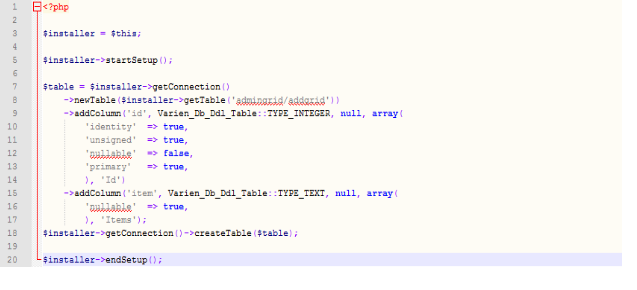
We have given here the Table Name : admingrid_addgrid.
Columns : id, item.
Step 5:
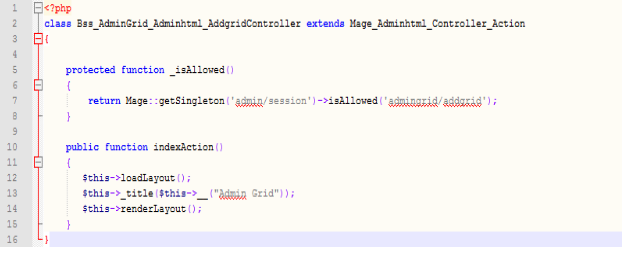
Now Create a Controller for Grid page backend.Go to the app\code\local\Bss\AdminGrid\controllers\Adminhtml and create a AddgridController.php file.
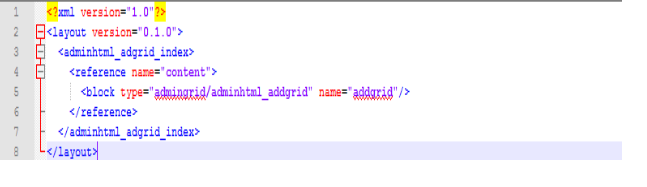
Now declare the layout of Adminhtml in file config.xml and add this code.
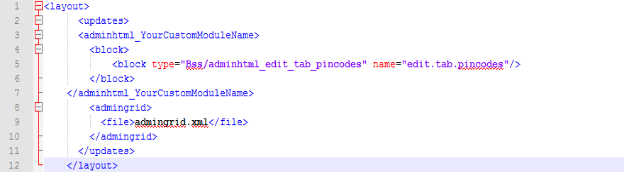
Create a layout file for Grid page. For this go to the app\design\adminhtml\default\default\layout and create admingrid.xml file.Add Below Code.
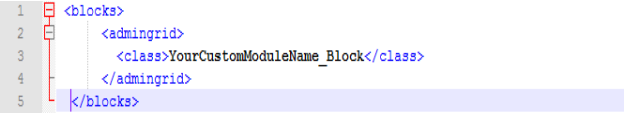
Create Block for Grid page add this code in config.xml file.
Step 6:
Now go to the app\code\local\Bss\AdminGrid\Block\Adminhtml and create a Addgrid.php file.
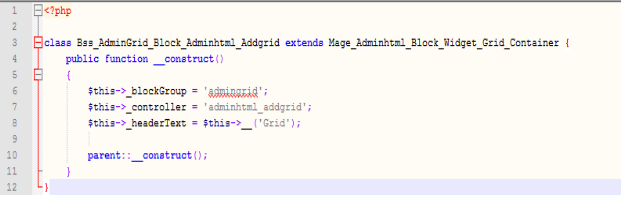
Now go to the app\code\local\Bss\AdminGrid\Block\Adminhtml\Addgrid and create a Grid.php file.

When we click on the AdminGrid/Manage Items at Backend.We’ll see a simple Grid page created.

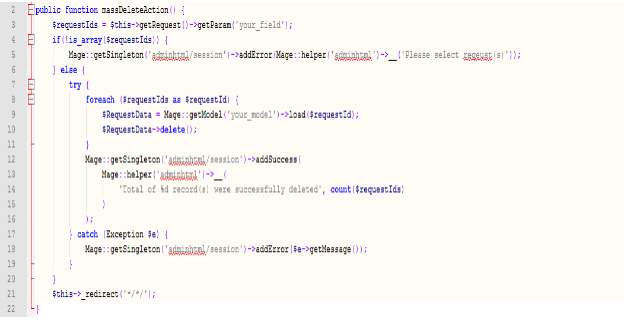
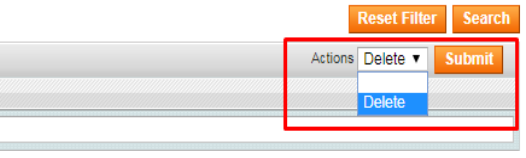
Add a Mass Action in Grid:
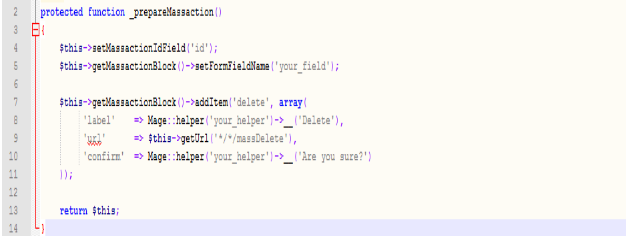
To add a mass action in grid we have to go to app\code\local\Bss\AdminGrid\Block\Adminhtml\Addgrid. Open the Grid.php file and add the below code into the file.We will add a delete action in this mass action.
Add this code into the file and mass action is added in grid. Now go to the app\code\local\Bss\AdminGrid\controllers\Adminhtml\AddgridController.php and add this code into the file.